An important and powerful aspect of Red Hat Enterprise Linux is the open, user-configurable method it uses for starting the operating system. Users are free to configure many aspects of the boot process, including specifying the programs launched at boot-time. Similarly, system shutdown gracefully terminates processes in an organized and configurable way, although customization of this process is rarely required.
Understanding how the boot and shutdown processes work not only allows customization, but also makes it easier to troubleshoot problems related to starting or shutting down the system.
The Boot Process
Below are the basic stages of the boot process for an x86 system:
1.The system BIOS checks the system and launches the first stage boot loader on the MBR of the primary hard disk.
2.The first stage boot loader loads itself into memory and launches the second stage boot loader from the /boot/ partition.
3. The second stage boot loader loads the kernel into memory, which in turn loads any necessary modules and mounts the root partition read-only.
4. The kernel transfers control of the boot process to the /sbin/init program.
5. The /sbin/init program loads all services and user-space tools, and mounts all partitions listed in /etc/fstab.
6. The user is presented with a login screen for the freshly booted Linux system.
The BIOS
When an x86 computer is booted, the processor looks at the end of system memory for the Basic Input/Output System or BIOS program and runs it. The BIOS controls not only the first step of the boot process, but also provides the lowest level interface to peripheral devices. For this reason it is written into read-only, permanent memory and is always available for use.
Other platforms use different programs to perform low-level tasks roughly equivalent to those of the BIOS on an x86 system.
Once loaded, the BIOS tests the system, looks for and checks peripherals, and then locates a valid device with which to boot the system. Usually, it checks any diskette drives and optical drives present for bootable media, then, failing that, looks to the system's hard drives. In most cases, the order of the drives searched while booting is controlled with a setting in the BIOS, and it looks on the master IDE device on the primary IDE bus. The BIOS then loads into memory whatever program is residing in the first sector of this device, called the Master Boot Record or MBR. The MBR is only 512 bytes in size and contains machine code instructions for booting the machine, called a boot loader, along with the partition table. Once the BIOS finds and loads the boot loader program into memory, it yields control of the boot process to it.

The first thing to occur in the boot process is the Power-On Self Test (POST) that is performed by the compter's Basic Input/Output System (BIOS), when it is powered on. This self test is just that -- an internal check of the system's internal components. Other architectures may use different ways to accomplish this, but the purpose is identical. This checking normally involves the system RAM, CPUs, video card, hard drives, and other motherboard components. Many other types of internal cards such as RAID cards and various other types of controller cards perform their own self-testing. If errors occur, some form of alert will be generated or sent to a panel or console; the POST uses a series of beeps to indicate the specific error encountered. If all goes well, the BIOS reads the master boot record on the hard disk and loads the program that is found there into memory.
Master Boot Record
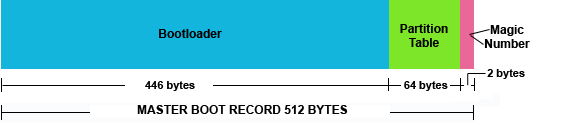
The Master Boot Record (MBR) is the first 512 bytes of the boot drive that is read into memory by the BIOS. (This is assuming we are using an x86 architecture.) The first 446 bytes of that 512 will normally contain a low-level boot code that points to a boot loader somewhere else on the disk - it can even point to another hard disk. The next 64 bytes contain the partition table for the disk (four 16-byte entries known as the IBM Partition Table Scheme). Finally, the remaining 2 bytes are the "Magic Number" (used for error detection).
The Boot Loader
A boot loader for the x86 platform is broken into at least two stages. The first stage is a small machine code binary on the MBR. Its sole job is to locate the second stage boot loader and load the first part of it into memory.
GRUB has the advantage of being able to read ext2, ext3, and ext4 partitions and load its configuration file — /boot/grub/grub.conf — at boot time.
he purpose of a bootloader is to load the operating system. Many boot loaders are available; however, LILO and GRUB are the most common for Linux. Windows has its own, called the New Technology Loader (NTLDR). You may have at one time or another seen the message "NTLDR is missing"; this is a Windows bootloader error.
Regardless of the bootloader being used, it is important to keep in mind that bootloaders are very complex and easily rendered inoperative by inexperienced users with root access. In my opinion, the best practice is to explore their workings only on machines you are using as sandboxes or in virtual machines to sharpen your skills. One slight typographical error while working with, e.g., grub.conf, and you may be spending more time than you anticipated trying to fix your error; however, this too, can be a great learning experience, as long as it is on a sandbox and you can afford the time.
The most common bootloader program in use today for modern Linux systems is the GRand Unified Bootloader (GRUB). This is the bootloader we will be talking about, here. The GRUB bootloader is a program written to the master boot record and /boot partition of a hard drive that loads the operating system. The bootloader code used to fit in the first 446 bytes of the MBR, but, owing to progressively increasing complexity of operating systems and the need to boot almost any operating system, it has grown in size. Currently, a subset of the bootloader code is written to the MBRi, and the remainder is written to the /boot partition. In addition, the GRUB bootloader is modular in design and works in stages which I will only cover briefly.
The stages of GRUB
GRUB works in stages called Stage1, Stage1_5, and Stage 2. I will give a brief overview of what each stage does.
Stage1
The stage1 code of GRUB is written within the 512 bytes of the master boot record. Because of the limited size of the master boot record area, GRUB stage1 will usually point to the next stage of GRUB, stage1_5 or stage2. GRUB may or may not need to load stage1_5 depending on the types of filesystems present.
Stage1_5 is the intermediate stage between stage1 and stage2. If you look at your /boot/grub area, you should see various stage1_5 files with names of various types of filesystems. Stage1_5 deals with specific types of filesystems, and is named after them. This code will allow the filesystem to be interpreted appropriately.
These are the stage1_5 files located in my /boot/grub directory:
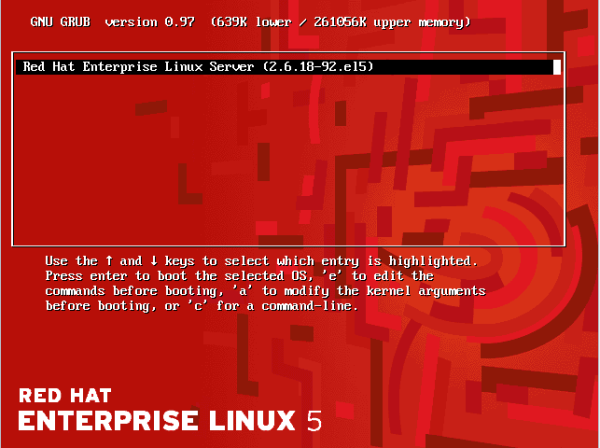
This is the main GRUB image, and will usually reside on the filesystem in the /boot partition at /boot/grub/stage2. It reads the /boot/grub/grub.conf file for configuration information that details how it will load the kernel. It also has an interactive interface that will allow you to troubleshoot, re-install, or modify how GRUB works. Stage2 will present the user with a graphical boot menu entry. If the appropriate key is not pressed in the time allotted to enter the hidden menu, or nothing is selected in the time frame allowed, GRUB will boot the default entry.
GRUB has a really helpful tab-completion feature that you can use to assist you in getting your system up and running if, for example, you have a non-bootable system due to a improperly specified line in your grub.conf file. I have used it in this way many times to get unbootable systems working again.
/boot/grub/grub.conf
This file specifies the kernel to load and the initrd image file with all of the modules to load for your system.
Here is a typical grub.conf file for Red Hat Linux:
key to view my options.
Booting manually with GRUB tab completion
, and view your options; after selecting one, type one or more letters (whatever's necessary for a unique name) and let GRUB complete it for you. The additional option of " and let GRUB do the work by listing your possible choices. You may also have to further specify modules and additional options.
When GRUB transfers control to the kernel and the kernel is booting, you may see a lot of text output. On Red Hat-based systems, the line in grub.conf specifying the kernel may have an "
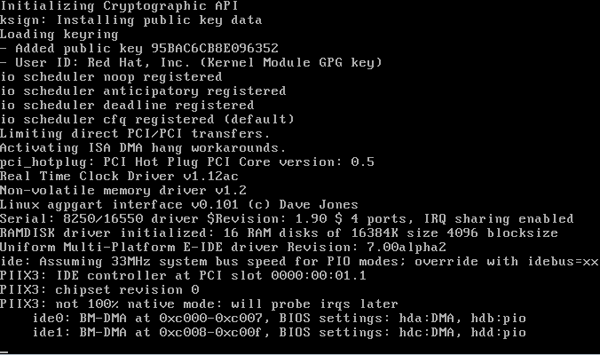
What is actually going on at this time is that the kernel is probing your hardware and configuring itself for your hardware. The kernel is also loading modules in the initrd image that it needs to operate your hardware. Note that the information will scroll very quickly up your screen - so, if you believe your problem exists at the kernel level, be sure to watch closely, as this is sure to give you a clue about where your problem lies. Once the kernel is done with its initialization, it starts the system's first process, which is /sbin/init.
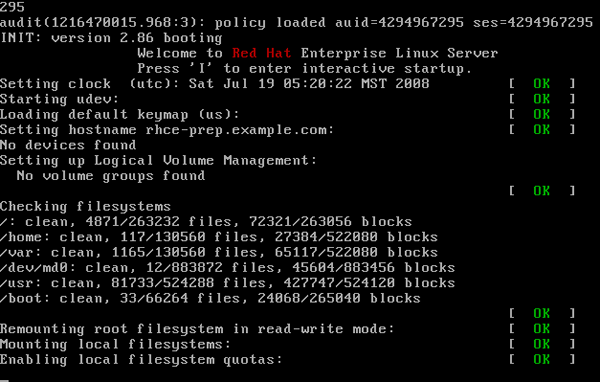
Init is the first process running on your system. It reads the /etc/inittab file, executes /etc/rc.d/rc.sysinit, then boots into the runlevel as defined in /etc/inittab.
Init starts out with a Process ID (PID) of 1. In the image above, there's a line saying "INIT: version 2.86 booting"; this is /sbin/init taking over at this point in the boot process. On the line right after that one, you see the messages being displayed by the /etc/rc.d/rc.sysinit shell script; as a matter of fact, the entire screen contains messages from that script, so you can get an idea of some of the functions it performs. Init will also normally start several instances of /sbin/getty or /sbin/mingetty, which are your virtual terminals. This is why you can hit + + < F1> through and come up with a virtual terminal.
Next, we will look at the /etc/inittab file, specifically, at the configuration file for Init:
+ + ) from restarting the server. People are human and make mistakes; I have seen typographical errors in both places that can cause problems. Unlike the "
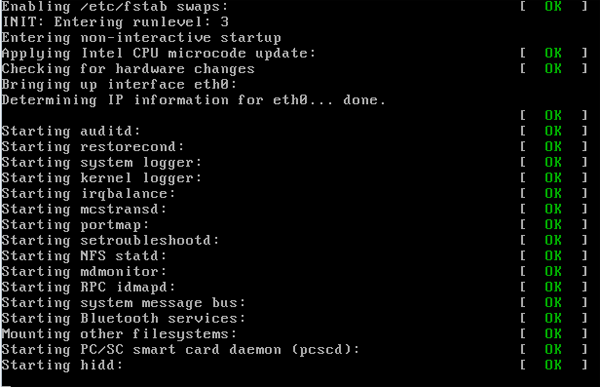
When you enter your runlevel, you will see further Init messages being printed to the screen (depending if your machine is configured to do so), again ending with a [ OK ] or [Failed] depending on whether it started successfully or not. These are your startup services within your runlevels. When you look at your /etc/inittab file, you will see a line like "
To get an overview of what processes get started or stopped for any particular runlevel, we should look within the /etc/rcX.d (where X is your runlevel) directory. Inside these directories, you will see symbolic links to the files in your /etc/init.d/ directory. The file names will be prefixed with either a 'K' or an 'S' (signifying kill or start) for the given daemon at that runlevel. The number immediately after the letter positions the script in the start order, because the processes are started alphabetically. With Red Hat-based systems, the "
Resources
1) http://docs.redhat.com/docs/en-US/Red_Hat_Enterprise_Linux/6/html/Installation_Guide/s2-boot-init-shutdown-loader.html
2)http://linuxgazette.net/156/prestia.html
Regardless of the bootloader being used, it is important to keep in mind that bootloaders are very complex and easily rendered inoperative by inexperienced users with root access. In my opinion, the best practice is to explore their workings only on machines you are using as sandboxes or in virtual machines to sharpen your skills. One slight typographical error while working with, e.g., grub.conf, and you may be spending more time than you anticipated trying to fix your error; however, this too, can be a great learning experience, as long as it is on a sandbox and you can afford the time.
GRUB
The most common bootloader program in use today for modern Linux systems is the GRand Unified Bootloader (GRUB). This is the bootloader we will be talking about, here. The GRUB bootloader is a program written to the master boot record and /boot partition of a hard drive that loads the operating system. The bootloader code used to fit in the first 446 bytes of the MBR, but, owing to progressively increasing complexity of operating systems and the need to boot almost any operating system, it has grown in size. Currently, a subset of the bootloader code is written to the MBRi, and the remainder is written to the /boot partition. In addition, the GRUB bootloader is modular in design and works in stages which I will only cover briefly.
The stages of GRUB
GRUB works in stages called Stage1, Stage1_5, and Stage 2. I will give a brief overview of what each stage does.
Stage1
The stage1 code of GRUB is written within the 512 bytes of the master boot record. Because of the limited size of the master boot record area, GRUB stage1 will usually point to the next stage of GRUB, stage1_5 or stage2. GRUB may or may not need to load stage1_5 depending on the types of filesystems present.
[root@localhost grub]# file stage1
stage1: x86 boot sector, code offset 0x48
Stage1_5
Stage1_5 is the intermediate stage between stage1 and stage2. If you look at your /boot/grub area, you should see various stage1_5 files with names of various types of filesystems. Stage1_5 deals with specific types of filesystems, and is named after them. This code will allow the filesystem to be interpreted appropriately.
These are the stage1_5 files located in my /boot/grub directory:
e2fs_stage1_5
fat_stage1_5
ffs_stage1_5
iso9660_stage1_5
jfs_stage1_5
minix_stage1_5
reiserfs_stage1_5
ufs2_stage1_5
vstafs_stage1_5
xfs_stage1_5
Stage2
This is the main GRUB image, and will usually reside on the filesystem in the /boot partition at /boot/grub/stage2. It reads the /boot/grub/grub.conf file for configuration information that details how it will load the kernel. It also has an interactive interface that will allow you to troubleshoot, re-install, or modify how GRUB works. Stage2 will present the user with a graphical boot menu entry. If the appropriate key is not pressed in the time allotted to enter the hidden menu, or nothing is selected in the time frame allowed, GRUB will boot the default entry.
GRUB has a really helpful tab-completion feature that you can use to assist you in getting your system up and running if, for example, you have a non-bootable system due to a improperly specified line in your grub.conf file. I have used it in this way many times to get unbootable systems working again.
/boot/grub/grub.conf
This file specifies the kernel to load and the initrd image file with all of the modules to load for your system.
Here is a typical grub.conf file for Red Hat Linux:
# grub.conf generated by anaconda
#
# Note that you do not have to rerun grub after making changes to this file
# NOTICE:  You have a /boot partition.  This means that
#          all kernel and initrd paths are relative to /boot/, eg.
#          root (hd0,0)
#          kernel /vmlinuz-version ro root=/dev/hdb9
#          initrd /initrd-version.img
#boot=/dev/hdb
default=0
timeout=5
splashimage=(hd0,0)/grub/splash.xpm.gz
hiddenmenu
title Red Hat Enterprise Linux Server   (2.6.18-53.el5)
        root (hd0,0)
        kernel /vmlinuz-2.6.18-53.el5 ro root=LABEL=/ rhgb quiet
        initrd /initrd-2.6.18-53.el5.img
This file is fairly easy to edit; because of this, it is a common location for errors.GNU GRUB version 0.97 (640K lower / 3072K upper memory) [Minimal BASH-like line editing is supported. For the first word, TAB lists possible command completions. Anywhere else, TAB lists the possible completions of a device/filename.] grub>Nothing but a GRUB prompt - now what do we do? If you're making any changes to this file, remember to print it out first, and make a backup copy; it may save you if you make a typo. You can use the hardcopy to recall the options necessary to boot your machine and fix your mistake. There are various errors, and it pays to become familiar with some of the common ones such as an incorrectly specified kernel name, or a root partition that is improperly designated in this file. If you do see this GRUB prompt, ask yourself this question, "What do I do now to recover my system?" If you have no idea at this point, and you are managing Linux systems, it would probably be a good idea to get on a practice box and create some errors within the grub.conf, and get to know your bootloader. Here's what could be done in the above situation - notice where I hit the
Booting manually with GRUB tab completion
grub> root (hd0,0) Filesystem type is ext2fs, partition type 0x83 grub> kernel /The "Possible files are: lost+found grub initrd-2.6.18-8.el5.img System.map-2.6.18- 8.el5 config-2.6.18-8.el5 symvers-2.6.18-8.el5.gz vmlinuz-2.6.18-8.el5 grub> kernel /vmlinuz-2.6.18-8.el5 ro root=LABEL=/ [Linux-bzImage, setup=0x1e00, size=0x1ad054] grub> initrd / Possible files are: lost+found grub initrd-2.6.18-8.el5.img System.map-2.6.18- 8.el5 config-2.6.18-8.el5 symvers-2.6.18-8.el5.gz vmlinuz-2.6.18-8.el5 grub> initrd /initrd-2.6.18-8.el5.img [Linux-initrd @ 0xfe8a000, 0x15547c bytes] grub> boot
root (hd0,0)" specifies the first drive, and the first partition on that drive. On the kernel line, you can type '/', hit ro root=LABEL=/" came from my experience of working with Red Hat systems; yours may be different - so you need to examine the options in your grub.conf file. The same thing happens on the initrd line: after the /, hit Kernel
When GRUB transfers control to the kernel and the kernel is booting, you may see a lot of text output. On Red Hat-based systems, the line in grub.conf specifying the kernel may have an "
rhgb quiet" appended to it that prevents this. It stands for "Red Hat graphical boot quiet" and will suppress kernel boot messages. When I need to see boot messages, I interrupt the GRUB cycle by hitting the escape key, hitting 'e' for edit (the procedure to modify the grub kernel arguments is at the bottom of the GRUB screen), and editing the kernel line. Removing the "rhgb quiet" allows me to see the kernel messages so I can determine if any of them are relevant to, e.g., a kernel panic or a similar problem.What is actually going on at this time is that the kernel is probing your hardware and configuring itself for your hardware. The kernel is also loading modules in the initrd image that it needs to operate your hardware. Note that the information will scroll very quickly up your screen - so, if you believe your problem exists at the kernel level, be sure to watch closely, as this is sure to give you a clue about where your problem lies. Once the kernel is done with its initialization, it starts the system's first process, which is /sbin/init.
[ Much, but not all, of the boot information is available in the /var/log/dmesg file, once you've booted. -- Ben ]
INIT
Init is the first process running on your system. It reads the /etc/inittab file, executes /etc/rc.d/rc.sysinit, then boots into the runlevel as defined in /etc/inittab.
Init starts out with a Process ID (PID) of 1. In the image above, there's a line saying "INIT: version 2.86 booting"; this is /sbin/init taking over at this point in the boot process. On the line right after that one, you see the messages being displayed by the /etc/rc.d/rc.sysinit shell script; as a matter of fact, the entire screen contains messages from that script, so you can get an idea of some of the functions it performs. Init will also normally start several instances of /sbin/getty or /sbin/mingetty, which are your virtual terminals. This is why you can hit
Next, we will look at the /etc/inittab file, specifically, at the configuration file for Init:
#
# inittab       This file describes how the INIT process should set up
#               the system in a certain run-level.
#
# Author:       Miquel van Smoorenburg,
#               Modified for RHS Linux by Marc Ewing and Donnie Barnes
#

# Default runlevel. The runlevels used by RHS are:
#   0 - halt (Do NOT set initdefault to this)
#   1 - Single user mode
#   2 - Multiuser, without NFS (The same as 3, if you do not have networking)
#   3 - Full multiuser mode
#   4 - unused
#   5 - X11
#   6 - reboot (Do NOT set initdefault to this)
#
id:5:initdefault:

# System initialization.
si::sysinit:/etc/rc.d/rc.sysinit

l0:0:wait:/etc/rc.d/rc 0
l1:1:wait:/etc/rc.d/rc 1
l2:2:wait:/etc/rc.d/rc 2
l3:3:wait:/etc/rc.d/rc 3
l4:4:wait:/etc/rc.d/rc 4
l5:5:wait:/etc/rc.d/rc 5
l6:6:wait:/etc/rc.d/rc 6

# Trap CTRL-alt-DELETE
ca::ctrlaltdel:/sbin/shutdown -t3 -r now

# When our UPS tells us power has failed, assume we have a few minutes
# of power left.  Schedule a shutdown for 2 minutes from now.
# This does, of course, assume you have powerd installed and your
# UPS connected and working correctly.
pf::powerfail:/sbin/shutdown -f -h +2 "Power Failure; System Shutting Down"

# If power was restored before the shutdown kicked in, cancel it.
pr:12345:powerokwait:/sbin/shutdown -c "Power Restored; Shutdown Cancelled"


# Run gettys in standard runlevels
1:2345:respawn:/sbin/mingetty tty1
2:2345:respawn:/sbin/mingetty tty2
3:2345:respawn:/sbin/mingetty tty3
4:2345:respawn:/sbin/mingetty tty4
5:2345:respawn:/sbin/mingetty tty5
6:2345:respawn:/sbin/mingetty tty6

# Run xdm in runlevel 5
x:5:respawn:/etc/X11/prefdm -nodaemon
Depending on what Init is doing, you may see typical Init script verification messages getting printed to the screen, i.e., [ OK ] or [Failed] to aid in troubleshooting. You may see a message like "Press 'I' to enter interactive startup" (on Red Hat-based systems); this is an indication of rc.sysinit executing, and allows the operator a certain level of control over the still-booting system. rc.sysinit ends with your default runlevel (as defined in /etc/inittab) being started. This is another common place for errors, because servers will usually have the "
id:5:initdefault:" line set to 3, so the machine boots to runlevel 3 instead of runlevel 5. Another common place for errors is the line pertaining to "ca::ctrlaltdel:/sbin/shutdown -t3 -r now" commented out to prevent the 3-finger salute (mount -a" command, which will alert you if errors exist in your mount points in the /etc/fstab file, executing the command "init q" will reread your /etc/inittab, but will not check for errors in the runlevels themselves; the best way to know if errors exist is to learn this file and to be very, very careful if you decide to modify any of the /etc/rc*/* files.Runlevels
When you enter your runlevel, you will see further Init messages being printed to the screen (depending if your machine is configured to do so), again ending with a [ OK ] or [Failed] depending on whether it started successfully or not. These are your startup services within your runlevels. When you look at your /etc/inittab file, you will see a line like "
id:5:initdefault:"; this is your default runlevel. The default runlevel on most servers will be set to 3; on desktops, of course, it's set to 5, so we can have an X Window System session start as soon as the system boots up.To get an overview of what processes get started or stopped for any particular runlevel, we should look within the /etc/rcX.d (where X is your runlevel) directory. Inside these directories, you will see symbolic links to the files in your /etc/init.d/ directory. The file names will be prefixed with either a 'K' or an 'S' (signifying kill or start) for the given daemon at that runlevel. The number immediately after the letter positions the script in the start order, because the processes are started alphabetically. With Red Hat-based systems, the "
chkconfig" command will alter the symbolic links to start or stop the daemon in a desired runlevel; the 'S' or 'K' will change appropriately and the number will most likely change as well.Login
That sums up the outline of the boot process for a typical Linux machine. At this point, you should have a better understanding of what goes on up until the login prompt or dialog on your screen. Last of all, always pay close attention to the details: the machine will most likely tell you what is wrong if you're experiencing problems.Resources
1) http://docs.redhat.com/docs/en-US/Red_Hat_Enterprise_Linux/6/html/Installation_Guide/s2-boot-init-shutdown-loader.html
2)http://linuxgazette.net/156/prestia.html